Mikrotik Hotspot Quick Setup Guide + Tips n Tricks for Hotspot !
A HOTSPOT is way to provide internet access to subscribers by means of an easy to use login interface as it does not require any client software/driver/dialer at user end. To log in, users may use almost any web browser , so they are not required to install additional software.It is also possible to allow users to access some web pages without authentication using Walled Garden feature.


In my personnel opinion, Hotspot is best suited for ad hoc situations, where you cannot control how the client has their machines configured. This is generally useful in Conference Rooms, Hotels, Cafe’s , Restaurants and likewise since people will come and go and you have few permanent users.
One big advantage of using hotspot is that HotSpot does not require any client software/driver/dialer. One disadvantage of using HotSpot is that its usually requires your client to open up his browser to log in before he can use your service . So users wanting to connect to your service using a router or some kind usually have a problem (as routers usually don’t support logging in via HTTP).
Following is a quick setup guide (CLI version) on how-to setup HOTSPOT server in Mikrotik using command interface.
This guide will help you in setting up . . .
# HOTSPOT server,
# It will also configure DHCP to assign users IP Address from 172.16.0.1-172.16.0.255 ip pool .
Change it accordingly.
# I will add two Speed / Rate Limit Profiles, 256k and 512k, it will add a new user ‘zaib‘ password=test with 512k profile and user ‘test‘ Password=test with 256k Limit.
# It will Add Default Route to internet which is DSL router ip 192.168.2.2 ,
Change it accordingly.
In this examples, Mikrotik have two interface cards.
Ether1 LAN = 172.16.0.1 / Connected with LAN/Hotspot users
Ether2 WAN = 192.168.2.1 / Connected with DSL router
DSL Router = 192.168.2.2
Script Starts Below.
/ip addressadd address=172.16.0.1/24 comment=LAN disabled=no interface=ether1 network=172.16.0.0add address=192.168.2.1/24 comment=WAN disabled=no interface=ether2 network=192.168.2.0/ip pooladd name=hs-pool-1 ranges=172.16.0.10-172.16.0.255/ip dnsset allow-remote-requests=yes cache-max-ttl=1w cache-size=10000KiB max-udp-packet-size=512 servers=192.168.2.2/ip dhcp-serveradd
address-pool=hs-pool-1 authoritative=after-2sec-delay
bootp-support=static disabled=no interface=ether1 lease-time=1h
name=dhcp1/ip dhcp-server config set store-leases-disk=5m/ip dhcp-server network add address=172.16.0.0/24 comment="hotspot network" gateway=172.16.0.1/ip hotspot profileset
default dns-name="" hotspot-address=0.0.0.0 html-directory=hotspot
http-cookie-lifetime=3d http-proxy=0.0.0.0:0 login-by=cookie,http-chap
name=default rate-limit="" smtp-server=0.0.0.0 split-user-domain=no
use-radius=noadd
dns-name=login.aacable.net hotspot-address=172.16.0.1
html-directory=hotspot http-cookie-lifetime=1d http-proxy=0.0.0.0:0
login-by=cookie,http-chap name=hsprof1 rate-limit="" smtp-server=0.0.0.0
split-user-domain=no use-radius=no/ip hotspotadd
address-pool=hs-pool-1 addresses-per-mac=2 disabled=no idle-timeout=5m
interface=ether1 keepalive-timeout=none name=hotspot1 profile=hsprof1/ip hotspot user profileset default idle-timeout=none keepalive-timeout=2m name=default shared-users=1 status-autorefresh=1m transparent-proxy=noadd
address-pool=hs-pool-1 advertise=no idle-timeout=none
keepalive-timeout=2m name="512k Limit" open-status-page=always
rate-limit=512k/512k shared-users=1 status-autorefresh=1m
transparent-proxy=yesadd
address-pool=hs-pool-1 advertise=no idle-timeout=none
keepalive-timeout=2m name="256k Limit" open-status-page=always
rate-limit=256k/256k shared-users=1 status-autorefresh=1m
transparent-proxy=yes/ip hotspot service-port set ftp disabled=yes ports=21/ip hotspot walled-garden ip add action=accept disabled=no dst-address=172.16.0.1/ip hotspot set numbers=hotspot1 address-pool=none/ip firewall nat add action=masquerade chain=srcnat disabled=no/ip hotspot useradd disabled=no name=admin password=123 profile=defaultadd disabled=no name=zaib password=test profile="512k Limit" server=hotspot1add disabled=no name=test-256k password=test profile="256k Limit" server=hotspot1/ip routeadd disabled=no distance=1 dst-address=0.0.0.0/0 gateway=192.168.2.2 scope=30 target-scope=10 |

OR you can customize the hotspot login page to show your logo look like something

You can also make configuration changes via GUI.
Please read the following guide for easy n step by step guide on HOTSPOT setup.
http://wiki.mikrotik.com/wiki/Hotspot_server_setup
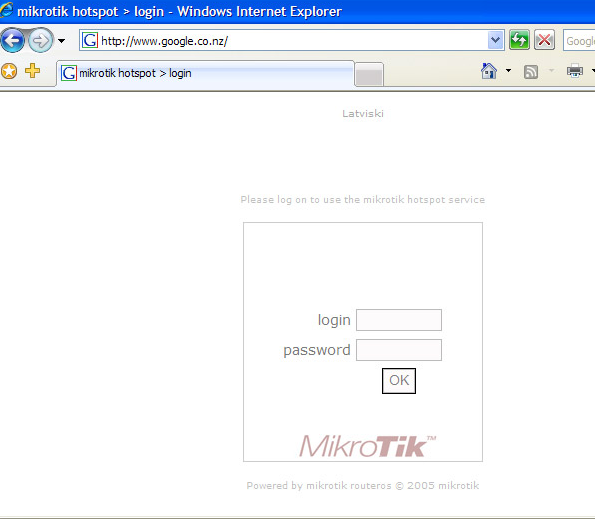
HOWTO CUSTOMIZE HOTSPOT LOGIN PAGE
You can use some fancy good looking login page. To customize the login page, Open Winbox , Goto Files , here you will see various files, look at hotspot/login.html , Drag n Drop this file to Desktop. See the attached picture.
Now open it using any html editor, I always prefer FRONTPAGE for editing HTML pages due to its easy interface. Customize it according to your need, You must have some prior knowledge of some website / html editing. You can insert your logo , advertisement and lot more in this page. After you are done, simply Upload the file back from where you downloaded it. use drag n drop feature. For beginners, I recommend you not to change any default variable, just ad your logo n text , After you are familiarized with the structure, you can build your own fully customized login page.
Good examples of hotspot login page can be found at following link.
Howto Redirect User to your selected site after succesful Login
If you want that after successful login to hotspot , user must be redirected to your advertisement web site / any other web, then You will need to replace a variable on the hotspot/login.html document on the mikrotik router.You must replace $(link-orig) with the url of the website you want them to get after login.
There are two links that you have to replace, and both look like this:
1
| <input type="hidden" name="dst" value="$(link-orig)"> |
1
| <input type="hidden" name="dst" value="http://aacable.wordpress.com"> |
Howto Allow URL for some destinations for non authenticated Users
Sometimes it is required to allow access to some destinations / URLs for non authenticated users, for example if you have a web / radius server and you want that user can access it without login to hotspot, then you can add its ip address in walled garden./ip hotspot walled-garden add dst-host=www.website.com/ip hotspot walled-garden ip add dst-address=192.168.2.2 action=acceptOR/ip firewall nat add chain=pre-hotspot dst-address=192.168.2.2 action=accept |
HOTSPOT users can’t communicate with each other on LAN or PROXY-ARP issue
If you face hotspot broadcast issue / arp-poisoning , problem, Remove
the address pool from the Hotspot to turn off Universal NAT,
/ip hotspot set <number> address-pool=noneOR/ip hotspot set numbers=hotspot1 address-pool=noneOR/ip firewall nat add chain=pre-hotspot dst-address-type=!local hotspot=auth action=accept
Howto Bypass authentication for Few Clients.
This bypasses the hotspot by mac address(change xx:xx:xx:xx:xx:xx with your user's mac address. You can also use the ip address to bypass.
/ip hotspot ip-binding add mac-address=xx:xx:xx:xx:xx:xx type=bypassed


Setup system Emailer
I have noticed that in RouterOS v2, the emailer uses the system identity as the HELO/EHLO host name. Some mail servers won't accept a host name with spaces or other characters. RouterOS v3 doesn't seem to be effected by this.
The following is for version 3 and 4:
/tool e-mail
set server=69.18.98.42:587 from="mikrotik@bignetworks.com"
/system watchdog
set auto-send-supout=yes send-email-to=notify@bignetworks.com send-smtp-server=69.18.98.42
The following is required for version 5:
/tool e-mail
set address=69.18.98.42 port=587 from="mikrotik@bignetworks.com"
/system watchdog
set auto-send-supout=yes send-email-to=notify@bignetworks.com send-smtp-server=69.18.98.42
NTP Client and Time Zone
/system clock
set time-zone-name=America/Chicago
/system ntp client
set enabled=yes mode=unicast primary-ntp=129.6.15.28 secondary-ntp=129.6.15.29
Google Public DNS Settings
For newer routers:
/ip dns
set allow-remote-requests=yes cache-max-ttl=1w cache-size=2048KiB max-udp-packet-size=512 servers=8.8.8.8,8.8.4.4
For older routers:
/ip dns
set allow-remote-requests=yes cache-max-ttl=1w primary-dns=8.8.8.8 secondary-dns=8.8.4.4
OpenDNS DNS Settings
For newer routers:
/ip dns
set allow-remote-requests=yes cache-max-ttl=1w cache-size=2048KiB max-udp-packet-size=512 servers=208.67.222.222,208.67.220.220
For older routers:
/ip dns
set allow-remote-requests=yes cache-max-ttl=1w primary-dns=208.67.222.222 secondary-dns=208.67.220.220
Protecting your WAN Interface
# Pick your WAN input interface
# DO NOT COPY AND PASTE ALL THESE RULES!!!

/ ip firewall filter

add chain=input in-interface=ether1 action=jump jump-target=protect-wan-input src-address-list=!allowed-management comment="Filter WAN input" disabled=no
add chain=input in-interface=ether2 action=jump jump-target=protect-wan-input src-address-list=!allowed-management comment="Filter WAN input" disabled=no
add chain=input in-interface=ether3 action=jump jump-target=protect-wan-input src-address-list=!allowed-management comment="Filter WAN input" disabled=no
add chain=input in-interface=ether4 action=jump jump-target=protect-wan-input src-address-list=!allowed-management comment="Filter WAN input" disabled=no
add chain=input in-interface=ether5 action=jump jump-target=protect-wan-input src-address-list=!allowed-management comment="Filter WAN input" disabled=no
add chain=input in-interface=ether6 action=jump jump-target=protect-wan-input src-address-list=!allowed-management comment="Filter WAN input" disabled=no
add chain=input in-interface=ether7 action=jump jump-target=protect-wan-input src-address-list=!allowed-management comment="Filter WAN input" disabled=no
add chain=input in-interface=ether8 action=jump jump-target=protect-wan-input src-address-list=!allowed-management comment="Filter WAN input" disabled=no
add chain=input in-interface=ether9 action=jump jump-target=protect-wan-input src-address-list=!allowed-management comment="Filter WAN input" disabled=no
add chain=input in-interface=ether10 action=jump jump-target=protect-wan-input src-address-list=!allowed-management comment="Filter WAN input" disabled=no
add chain=input in-interface=ether11 action=jump jump-target=protect-wan-input src-address-list=!allowed-management comment="Filter WAN input" disabled=no

add chain=input in-interface=pppoe action=jump jump-target=protect-wan-input src-address-list=!allowed-management comment="Filter WAN input" disabled=no

add chain=input action=jump jump-target=protect-wan-input in-interface=vlan src-address-list=!allowed-management comment="" disabled=no

# The protect-wan-input chain

/ ip firewall filter
add action=drop chain=protect-wan-input comment="Protect services running on the WAN interface" disabled=no dst-port=21 protocol=tcp
add action=drop chain=protect-wan-input comment="" disabled=no dst-port=22 protocol=tcp
add action=drop chain=protect-wan-input comment="" disabled=no dst-port=23 protocol=tcp
add action=drop chain=protect-wan-input comment="" disabled=no dst-port=53 protocol=tcp
add action=drop chain=protect-wan-input comment="" disabled=no dst-port=53 protocol=udp
add action=drop chain=protect-wan-input comment="" disabled=no dst-port=80 protocol=tcp
add action=drop chain=protect-wan-input comment="" disabled=no dst-port=443 protocol=tcp
add action=drop chain=protect-wan-input comment="" disabled=no dst-port=3128 protocol=tcp
add action=drop chain=protect-wan-input comment="" disabled=no dst-port=8080 protocol=tcp
add action=drop chain=protect-wan-input comment="" disabled=no dst-port=64872-64875 protocol=tcp
add action=jump chain=protect-wan-input comment="" disabled=no jump-target=manage-icmp protocol=icmp
add chain=protect-wan-input action=accept comment="Log traffic WAN traffic" disabled=no

# manage-icmp chain

/ ip firewall filter
add chain=manage-icmp protocol=icmp icmp-options=8:0 action=accept comment="Allow pings" disabled=no
add chain=manage-icmp protocol=icmp icmp-options=0:0 action=accept comment="Accept responses to our pings" disabled=no
add chain=manage-icmp protocol=icmp icmp-options=3:0 action=accept comment="# Accept notifications of unreachable hosts" disabled=no
add chain=manage-icmp protocol=icmp icmp-options=4:0 action=accept comment="# Accept notifications to reduce sending speed" disabled=no
add chain=manage-icmp protocol=icmp icmp-options=11:0 action=accept comment="# Accept notifications of lost packets" disabled=no
add chain=manage-icmp protocol=icmp icmp-options=12:0 action=accept comment="# Accept notifications of protocol problems" disabled=no
add chain=manage-icmp protocol=icmp action=drop comment="Drop all other ICMP traffic" disabled=no
Traffic Marking and outbound queueing
/ip firewall mangle
add action=jump chain=prerouting comment="Jump to mark-traffic: MUST RETURN FROM THIS JUMP" disabled=no jump-target=mark-traffic
add action=jump chain=output comment="Jump to mark-traffic: MUST RETURN FROM THIS JUMP" disabled=no jump-target=mark-traffic packet-mark=no-mark
add action=mark-packet chain=mark-traffic comment="mark-traffic: default mark bulk" disabled=no new-packet-mark=bulk passthrough=yes
add action=mark-packet chain=mark-traffic comment="mark-traffic: voice" disabled=no dst-address-list=voice-servers new-packet-mark=voice passthrough=yes
add action=return chain=mark-traffic comment="" disabled=no packet-mark=voice
add action=return chain=mark-traffic comment="mark-traffic: end of chain return" disabled=no
/queue type
add kind=sfq name=qos sfq-allot=1514 sfq-perturb=5

/queue tree
add burst-limit=0 burst-threshold=0 burst-time=0s disabled=no limit-at=0 max-limit=0 name=queue-wan1-root packet-mark="" parent=ether1 priority=8 queue=qos
add burst-limit=0 burst-threshold=0 burst-time=0s disabled=no limit-at=0 max-limit=0 name=queue-wan1-bulk packet-mark=bulk,no-mark parent=queue-wan1-root priority=8 queue=qos
add burst-limit=0 burst-threshold=0 burst-time=0s disabled=no limit-at=0 max-limit=0 name=queue-wan1-voice packet-mark=voice parent=queue-wan1-root priority=1 queue=qos
add burst-limit=0 burst-threshold=0 burst-time=0s disabled=no limit-at=0 max-limit=0 name=queue-wan1-priority-data packet-mark=priority-data parent=queue-wan1-root priority=7 queue=qos

/queue tree
add burst-limit=0 burst-threshold=0 burst-time=0s disabled=no limit-at=0 max-limit=0 name=queue-wan2-root packet-mark="" parent=ether2 priority=8 queue=qos
add burst-limit=0 burst-threshold=0 burst-time=0s disabled=no limit-at=0 max-limit=0 name=queue-wan2-bulk packet-mark=bulk,no-mark parent=queue-wan2-root priority=8 queue=qos
add burst-limit=0 burst-threshold=0 burst-time=0s disabled=no limit-at=0 max-limit=0 name=queue-wan2-voice packet-mark=voice parent=queue-wan2-root priority=1 queue=qos
add burst-limit=0 burst-threshold=0 burst-time=0s disabled=no limit-at=0 max-limit=0 name=queue-wan2-priority-data packet-mark=priority-data parent=queue-wan2-root priority=7 queue=qos
Best Effort Queuing with Global-In and Guaranteed Queuing on outbound with two ISPs and connection tracking
This sets up three root queues: queue-root-global-in (best effort), queue-root-isp1 (guaranteed), queue-root-isp2 (guaranteed).
queue-root-global-in deals with traffic coming from the internet to the router and catches traffic that is bound for the router itself as well as traffic that will be forwarded through to NAT clients. There is a subqueue for each isp.
queue-root-isp1 deals with the outbound traffic to isp1 from the router as well as NAT clients behind the router.
queue-root-isp2 deals with the outbound traffic to isp2 from the router as well as NAT clients behind the router.
The traffic that is handled in these last two queues is marked by the mark-traffic mangle chain. The packet marks are generic to the type of traffic (bulk, priority, voice) because the root queues are connected to specific interfaces.
The traffic that is handled in the global-in queue is marked by rules in the prerouting chain. The packets marks are specific to the interface that the traffic came in on (isp1-bulk, isp2-bulk, etc) because the root queue is not connected to a specific interface but to global-in, which is an aggregate of ALL incoming packets on ALL interfaces.
/queue type
add kind=sfq name=qos sfq-allot=1514 sfq-perturb=5

/queue tree
add burst-limit=0 burst-threshold=0 burst-time=0s comment="isp1 outbound queue" disabled=no limit-at=128k max-limit=100M name=queue-root-isp1 parent=ether1 priority=8 queue=qos
add burst-limit=0 burst-threshold=0 burst-time=0s disabled=no limit-at=128k max-limit=100M name=isp1-bulk packet-mark=bulk,no-mark parent=queue-root-isp1 priority=8 queue=qos
add burst-limit=0 burst-threshold=0 burst-time=0s disabled=no limit-at=128k max-limit=100M name=isp1-priority packet-mark=priority parent=queue-root-isp1 priority=7 queue=qos
add burst-limit=0 burst-threshold=0 burst-time=0s disabled=no limit-at=128k max-limit=100M name=isp1-voice packet-mark=voice parent=queue-root-isp1 priority=1 queue=qos

add burst-limit=0 burst-threshold=0 burst-time=0s comment="isp2 outbound queue" disabled=no limit-at=128k max-limit=100M name=queue-root-isp2 parent=ether2 priority=8 queue=qos
add burst-limit=0 burst-threshold=0 burst-time=0s disabled=no limit-at=128k max-limit=100M name=isp2-bulk packet-mark=bulk,no-mark parent=queue-root-isp2 priority=8 queue=qos
add burst-limit=0 burst-threshold=0 burst-time=0s disabled=no limit-at=128k max-limit=100M name=isp2-priority packet-mark=priority parent=queue-root-isp2 priority=7 queue=qos
add burst-limit=0 burst-threshold=0 burst-time=0s disabled=no limit-at=128k max-limit=100M name=isp2-voice packet-mark=voice parent=queue-root-isp2 priority=1 queue=qos

add burst-limit=0 burst-threshold=0 burst-time=0s disabled=no limit-at=0 max-limit=0 name=global-in-root parent=global-in priority=8 comment="inbound queue root" queue=qos

add burst-limit=0 burst-threshold=0 burst-time=0s disabled=no limit-at=128k max-limit=100M name=isp1-from-internet-root parent=global-in-root priority=8 comment="isp1 inbound queue" queue=qos
add burst-limit=0 burst-threshold=0 burst-time=0s disabled=no limit-at=128k max-limit=100M name=isp1-fi-bulk packet-mark=isp1-fi-bulk parent=isp1-from-internet-root priority=8 queue=qos
add burst-limit=0 burst-threshold=0 burst-time=0s disabled=no limit-at=128k max-limit=100M name=isp1-fi-priority packet-mark=isp1-fi-priority parent=isp1-from-internet-root priority=7 queue=qos
add burst-limit=0 burst-threshold=0 burst-time=0s disabled=no limit-at=128k max-limit=100M name=isp1-fi-voice packet-mark=isp1-fi-voice parent=isp1-from-internet-root priority=1 queue=qos

add burst-limit=0 burst-threshold=0 burst-time=0s disabled=no limit-at=128k max-limit=100M name=isp2-from-internet-root parent=global-in-root priority=8 comment="isp2 inbound queue" queue=qos
add burst-limit=0 burst-threshold=0 burst-time=0s disabled=no limit-at=128k max-limit=100M name=isp2-fi-bulk packet-mark=isp2-fi-bulk parent=isp2-from-internet-root priority=8 queue=qos
add burst-limit=0 burst-threshold=0 burst-time=0s disabled=no limit-at=128k max-limit=100M name=isp2-fi-priority packet-mark=isp2-fi-priority parent=isp2-from-internet-root priority=7 queue=qos
add burst-limit=0 burst-threshold=0 burst-time=0s disabled=no limit-at=128k max-limit=100M name=isp2-fi-voice packet-mark=isp2-fi-voice parent=isp2-from-internet-root priority=1 queue=qos
These are the associated firewall rules:
/ip firewall mangle
add action=jump chain=prerouting comment="Jump to mark-traffic: MUST RETURN FROM THIS JUMP" disabled=no jump-target=mark-traffic

add action=mark-packet chain=prerouting comment="isp1 global-in packet marking - bulk" disabled=no in-interface=ether1 new-packet-mark=isp1-fi-bulk passthrough=yes
add action=mark-packet chain=prerouting comment="isp1 global-in voice" disabled=no in-interface=ether1 new-packet-mark=isp1-fi-voice passthrough=no src-address-list=voice-servers
add action=mark-packet chain=prerouting comment="isp1 global-in priority placeholder" disabled=yes in-interface=ether1 new-packet-mark=isp1-fi-priority passthrough=no src-address=1.1.1.1

add action=mark-packet chain=prerouting comment="isp2 global-in packet marking - bulk" disabled=no in-interface=ether2 new-packet-mark=isp2-fi-bulk passthrough=yes
add action=mark-packet chain=prerouting comment="isp2 global-in voice" disabled=no in-interface=ether2 new-packet-mark=isp2-fi-voice passthrough=no src-address-list=voice-servers
add action=mark-packet chain=prerouting comment="isp2 global-in priority placeholder" disabled=yes in-interface=ether2 new-packet-mark=isp2-fi-priority passthrough=no src-address=2.2.2.2

add action=jump chain=output comment="Jump to mark-traffic: MUST RETURN FROM THIS JUMP" disabled=no jump-target=mark-traffic packet-mark=no-mark

add action=mark-connection chain=prerouting comment="isp1 connection tracking" connection-state=new disabled=no in-interface=ether1 new-connection-mark=isp1 passthrough=no
add action=mark-routing chain=prerouting connection-mark=isp1 disabled=no in-interface=!ether1 new-routing-mark=isp1 passthrough=no
add action=mark-routing chain=output connection-mark=isp1 disabled=no new-routing-mark=isp1 passthrough=no src-address=1.1.1.0/30

add action=mark-connection chain=prerouting comment="isp2 connection tracking" connection-state=new disabled=no in-interface=ether2 new-connection-mark=isp2 passthrough=no
add action=mark-routing chain=prerouting connection-mark=isp2 disabled=no in-interface=!ether2 new-routing-mark=isp2 passthrough=no
add action=mark-routing chain=output connection-mark=isp2 disabled=no new-routing-mark=isp2 passthrough=no src-address=2.2.2.0/30

add action=mark-packet chain=mark-traffic comment="mark-traffic: default mark bulk" disabled=no new-packet-mark=bulk passthrough=yes
add action=mark-packet chain=mark-traffic comment="mark-traffic: voice" disabled=no dst-address-list=voice-servers new-packet-mark=voice passthrough=yes
add action=return chain=mark-traffic disabled=no packet-mark=voice

add action=mark-packet chain=mark-traffic comment="mark-traffic: priority (placeholder)" disabled=yes dst-address=1.1.1.1 new-packet-mark=priority passthrough=yes
add action=return chain=mark-traffic disabled=yes packet-mark=priority

add action=return chain=mark-traffic comment="mark-traffic: end of chain return" disabled=no
These are the needed routing table entries:
/ip route
add check-gateway=ping comment="default route via isp1" disabled=no distance=1 dst-address=0.0.0.0/0 gateway=1.1.1.1
add check-gateway=ping comment="default route via isp2" disabled=no distance=20 dst-address=0.0.0.0/0 gateway=2.2.2.1

add check-gateway=ping comment="isp1 default route" disabled=no dst-address=0.0.0.0/0 gateway=1.1.1.1 routing-mark=isp1
add check-gateway=ping comment="isp2 default route" disabled=no dst-address=0.0.0.0/0 gateway=2.2.2.1 routing-mark=isp2
Enable/Disable Services
/ ip service
set telnet port=23 address=0.0.0.0/0 disabled=no
set ftp port=21 address=0.0.0.0/0 disabled=yes
set www port=80 address=0.0.0.0/0 disabled=yes
set ssh port=22 address=0.0.0.0/0 disabled=no
set www-ssl port=443 address=0.0.0.0/0 certificate=none disabled=yes
Enable/Disable Service Ports
/ ip firewall service-port
set ftp ports=21 disabled=no
set tftp ports=69 disabled=no
set irc ports=6667 disabled=no
set h323 disabled=yes
set quake3 disabled=no
set gre disabled=no
set pptp disabled=no
Initial SNMP configuration
This simply turns on SNMP and sets the public community to only be access from localhost, which renders it useless.
Add your own community entry to make use of SNMP, but I recommend not deleting the public entry. This is due to an issue in the Mikrotik export function for SNMP.
/snmp
set contact="" enabled=yes engine-boots=0 engine-id="" location="" \
    time-window=15 trap-sink=0.0.0.0 trap-version=1
/snmp community
set public address=127.0.0.1/32 authentication-password="" \
    authentication-protocol=MD5 encryption-password="" encryption-protocol=\
    DES name=public read-access=yes security=none write-access=no
For v5:
/snmp
set contact="" enabled=yes engine-id="" location="" trap-community=public \
    trap-target=0.0.0.0 trap-version=1
/snmp community
set public address=127.0.0.1/32 authentication-password="" \
    authentication-protocol=MD5 encryption-password="" encryption-protocol=DES \
    name=public read-access=yes security=none write-access=no
add address=0.0.0.0/0 authentication-password="" authentication-protocol=MD5 \
    encryption-password="" encryption-protocol=DES name=localmon read-access=\
    yes security=none write-access=no
/snmp
set contact="" enabled=yes engine-id="" location="" trap-community=public \
    trap-target=0.0.0.0 trap-version=1
Protecting your LAN
/ip firewall filter
add chain=protect-lan connection-state=invalid action=drop comment="Drop invalid packets" disabled=no
add chain=protect-lan connection-state=established action=accept comment="Allow established traffic to pass" disabled=no
add chain=protect-lan connection-state=related action=accept comment="Allow related traffic to pass" disabled=no
add chain=protect-lan action=drop comment="Drop everything else" disabled=no
Private IP Subnet address lists
/ip firewall address-list
add address=10.0.0.0/8 comment="private 10.0.0.0/255.0.0.0" disabled=no list=private-ip-subnets
add address=172.16.0.0/12 comment="private 172.16.0.0/255.240.0.0" disabled=no list=private-ip-subnets
add address=192.168.0.0/16 comment="private 192.168.0.0/255.255.0.0" disabled=no list=private-ip-subnets
Dealing with SPAM from inside
These rules will allow outbound smtp from valid internal addresses, block it from ip's that we think are compromised, and track connections to determine if we think an ip is compromised.
/ip firewall filter
add action=jump chain=forward comment="Push outbound SMTP traffic to the filter-smtp chain - check address lists for banned IPs" disabled=no dst-port=25 \
    in-interface=bridge-lan jump-target=filter-smtp protocol=tcp

/ip firewall filter
add action=drop chain=filter-smtp comment="SPAM: Block SMTP from blacklist static list" disabled=no \
    src-address-list=smtp-possible-spammers-static
add action=add-src-to-address-list address-list=smtp-possible-spammers address-list-timeout=9m \
    chain=filter-smtp comment=\
    "SPAM: Test outbound connections for connection limit for whitelisted limit" connection-limit=\
    10,32 disabled=no dst-port=25 protocol=tcp src-address-list=smtp-allowed-outbound
add action=add-src-to-address-list address-list=smtp-possible-spammers address-list-timeout=9m \
    chain=filter-smtp comment="SPAM: Test outbound connections for connection limit" \
    connection-limit=2,32 disabled=no dst-port=25 protocol=tcp src-address-list=\
    !smtp-allowed-outbound
add action=log chain=filter-smtp comment="SPAM: Log SMTP from blacklist" disabled=no log-prefix=\
    possible-spammer src-address-list=smtp-possible-spammers
add action=drop chain=filter-smtp comment="SPAM: Block SMTP from blacklist" disabled=no \
    src-address-list=smtp-possible-spammers
add action=return chain=filter-smtp comment="SPAM: Good packet... return" disabled=no
Once this is done, we need to be notified somehow. This is done with a script that runs every X minutes. The script sends a single email for each address listed. Add addresses to the smtp-possible-spammers list for 10 minutes (or more) and run this scripts every 5 minutes.
:local spamadmin notify@bignetworks.com

:local count 0
:local message ""
:local tmp

:foreach i in=[/ip firewall address-list find list=smtp-possible-spammers] \
do={ \
:set count ($count + 1)
:set tmp ([/ip firewall address-list get $i address])
:set message ($message . $tmp . "\r\n")
:log warning ("possible spammfer found at " . $tmp)
}

:if ($count > 0) \
do={ \
:log info "watch-for-spammers sending notification"
/tool e-mail send \
     to=$spamadmin \
     subject=([/system identity get name] . ": $count possible spammers found") \
     body=$message
}

Paste the following in a terminal to create the above script:

/system script
add name=watch-for-spammers source=":local spamadmin notify@bignetworks.com\r\
    \n\r\
    \n:local count 0\r\
    \n:local message \"\"\r\
    \n:local tmp\r\
    \n\r\
    \n:foreach i in=[/ip firewall address-list find list=smtp-possible-spammer\
    s] \\\r\
    \ndo={ \\\r\
    \n:set count (\$count + 1)\r\
    \n:set tmp ([/ip firewall address-list get \$i address])\r\
    \n:set message (\$message . \$tmp . \"\\r\\n\")\r\
    \n:log warning (\"possible spammfer found at \" . \$tmp)\r\
    \n}\r\
    \n\r\
    \n:if (\$count > 0) \\\r\
    \ndo={ \\\r\
    \n:log info \"watch-for-spammers sending notification\"\r\
    \n/tool e-mail send \\\r\
    \n     to=\$spamadmin \\\r\
    \n     subject=([/system identity get name] . \": \$count possible spammer\
    s found\") \\\r\
    \n     body=\$message\r\
    \n}\r\
    \n"
This is the line to add the scheduled task.
/system scheduler
add comment="" disabled=no interval=5m name="check-spammer-list" on-event="/system script run watch-for-spammers" \
    start-date=jan/01/1970 start-time=00:00:00
An alternate method is to allow outbound SMTP only from a specified list of IP's. The rules below allow outbound SMTP from addresses on the list smtp-allowed-outbound, and logs all other tries to smtp-possible-spammers followed by the drop.
/ ip firewall filter
add chain=lan-forward-out action=accept dst-port=25 protocol=tcp \
    src-address-list=smtp-allowed-outbound comment="SPAM: Allow traffic from \
    whitelist" disabled=no
add chain=lan-forward-out action=add-src-to-address-list dst-port=25 \
    protocol=tcp address-list=smtp-possible-spammers address-list-timeout=0s \
    comment="Log all other outbound SMTP" disabled=no
add chain=lan-forward-out action=drop dst-port=25 protocol=tcp comment="Drop \
    all other outbound SMTP" disabled=no
Scripting
# list addresses in visisted-mailserver address-list
/ip firewall address-list
:foreach i in [find list=visited-mailservers ] do={:put [get $i address]}
Automated Backups
Make sure you change the smtpserver value to a valid SMTP server for your Internet connection.
:log info "backup Beginning now"
:local toaddress systembackup@bignetworks.com

:global subject ([/system identity get name] . " Backup " . [/system clock get time])
:global backupfile ([/system identity get name] . "_backup")

:log info "backup Backing up config"
/export file="$backupfile"

:log info "backup pausing for 3s"
:delay 3s

:log info "backup being emailed"
/tool e-mail send to=$toaddress subject=$subject file="$backupfile.rsc"

:log info "backup finished"
Paste the following in a terminal to create the above script:
/system script
add name=backup-router policy=ftp,reboot,read,write,policy,test,winbox,password,sniff,sensitive source=":log info \"backup\
    \_Beginning now\"\r\
    \n:local toaddress systembackup@bignetworks.com\r\
    \n\r\
    \n:global subject ([/system identity get name] . \" Backup \" . [/system clock get time])\r\
    \n:global backupfile ([/system identity get name] . \"_backup\")\r\
    \n\r\
    \n:log info \"backup Backing up config\"\r\
    \n/export file=\"\$backupfile\"\r\
    \n\r\
    \n:log info \"backup pausing for 3s\"\r\
    \n:delay 3s\r\
    \n\r\
    \n:log info \"backup being emailed\"\r\
    \n/tool e-mail send to=\$toaddress subject=\$subject file=\"\$backupfile.rsc\"\r\
    \n\r\
    \n:log info \"backup finished\"\r\
    \n"
If you want the router to automatically email you the backup on an interval use the following script:
/system scheduler
add disabled=no interval=1w name=backup-router-weekly on-event="/system script run backup-router \r\n"\
    start-date=jan/01/2012 start-time=01:00:00
Netwatching
This will send an email on up and down:
/tool netwatch
add comment="some-device" disabled=no \
 down-script="/tool e-mail send to=email@domain.com subject=\"some-device down\"" \
 up-script="/tool e-mail send to=email@domain.com subject=\"some-device up\"" \
 host=1.1.1.1
This will add an entry to the log on up and down:
/tool netwatch
add comment="some-device" disabled=no \
    down-script="/log warning message=\"some-device down\"" \
    up-script="/log warning message=\"some-device up\"" \
    host=1.1.1.1 interval=10s timeout=1s
Clearing the arp cache
The following script will clear the arp cache every $delaytime a total of $numloops times.
:log info "clearing arp table of dynamic entries"
:local counter 0
:local delaytime 5
:local numloops 12

:while ($counter < $numloops) do={ \

:log info "clearing arp loop"

:foreach i in=[/ip arp find dynamic=yes] do={ \
/ip arp remove $i
}

:log info "delaying..."

:delay $delaytime

}
Clear connections
This script clears the connection tracking table:
add name=clear-connections policy=ftp,reboot,read,write,policy,test,winbox,password,sniff,sensitive,api source=":log info message=\"clearing connections begin\
    \"\r\
    \n:foreach i in=[/ip firewall connection find] do={/ip firewall connection remove \$i}\r\
    \n:log info message=\"clearing connections end\"\r\
    \n"
Upgrade timing
RouterBoard 150

RouterOS 2.9.46, BIOS 2.9 -> RouterOS 2.9.51: 2m45s
RouterOS 2.9.51, BIOS 2.9 -> BIOS 2.12: 30s

RouterOS 2.9.51, BIOS 2.12 -> RouterOS 3.9: 2m5s
RouterOS 2.9.51, BIOS 2.12 -> RouterOS 3.9: 2m0s

RouterOS 3.9, BIOS 2.12 -> BIOS 2.14: 28s
RouterOS 3.9, BIOS 2.12 -> BIOS 2.14: 28s
OSPF Route Filtering
/routing filter
add action=accept chain=ospf-private-only-out comment="" disabled=no invert-match=no prefix=10.0.0.0/8 prefix-length=8-32
add action=accept chain=ospf-private-only-out comment="" disabled=no invert-match=no prefix=172.16.0.0/12 prefix-length=12-32
add action=accept chain=ospf-private-only-out comment="" disabled=no invert-match=no prefix=192.168.0.0/16 prefix-length=16-32
add action=discard chain=ospf-private-only-out comment="" disabled=no invert-match=no
add action=accept chain=ospf-private-only-in comment="" disabled=no invert-match=no prefix=10.0.0.0/8 prefix-length=8-32
add action=accept chain=ospf-private-only-in comment="" disabled=no invert-match=no prefix=172.16.0.0/12 prefix-length=12-32
add action=accept chain=ospf-private-only-in comment="" disabled=no invert-match=no prefix=192.168.0.0/16 prefix-length=16-32
add action=discard chain=ospf-private-only-in comment="" disabled=no invert-match=no

/routing ospf instance
set [ find default=yes ] disabled=no distribute-default=never in-filter=ospf-private-only-in metric-bgp=auto metric-connected=20 metric-default=1 \
    metric-other-ospf=auto metric-rip=20 metric-static=20 name=default out-filter=ospf-private-only-out redistribute-bgp=no redistribute-connected=as-type-1 \
    redistribute-other-ospf=no redistribute-rip=no redistribute-static=no router-id=0.0.0.0
Hotspot and Apple IOS
/ip hotspot profile set hsprof1 dns-name=""
/ip hotspot walled-garden
add action=allow comment="" disabled=no dst-host=www.apple.com path=/library/test/success.html
Send email with attached log on startup
/system scheduler
add comment="" disabled=no interval=0s name=startup-notify on-event="/log print file=mikrotik.log.txt\r\
    \n/tool e-mail send to=notify@bignetworks.com subject=\"\$[/system identity get name] startup at \$[/system c\
    lock get time] \$[/system clock get date]\" body=\"See attached log file\" file=mikrotik.log.txt\r\
    \n" policy=ftp,reboot,read,write,policy,test,winbox,password,sniff,sensitive start-time=startup
Private use MAC addresses
The following range of MAC Addresses are reserved for private use:
AC:DE:48:00:00:00 to AC:DE:48:FF:FF:FF
When creating bridge interfaces on the Mikrotik router, create an admin MAC address using this range. I pull the last three octets from an actual device on the router.
Pantech UML290
What makes it work is the phone number: *99***3#
/interface ppp-client
add add-default-route=yes allow=pap,chap,mschap1,mschap2 data-channel=0 \
    dial-command=ATDT dial-on-demand=no disabled=no info-channel=0 \
    keepalive-timeout=30 max-mru=1500 max-mtu=1500 modem-init="" mrru=disabled \
    name=ppp-out1 null-modem=no password="" phone=*99***3# pin="" port=usb2 \
    profile=default use-peer-dns=yes user=""
/interface ppp-client
set 0 add-default-route=yes allow=pap,chap,mschap1,mschap2 data-channel=0 \
    dial-command=ATDT dial-on-demand=no disabled=no info-channel=0 \
    keepalive-timeout=30 max-mru=1500 max-mtu=1500 modem-init="" mrru=disabled \
    name=ppp-out-cellular null-modem=no password="" phone=*99***3# pin="" port=usb2 \
    profile=default use-peer-dns=yes user=""
Sprint - Sierra Wireless 598
/interface ppp-client
add add-default-route=yes allow=pap,chap,mschap1,mschap2 data-channel=0 \
    dial-command=ATDT dial-on-demand=no disabled=no info-channel=0 \
    keepalive-timeout=30 max-mru=1500 max-mtu=1500 modem-init="" mrru=disabled \
    name=ppp-out-cellular null-modem=no password="" phone=#777 pin="" port=usb1 \
    profile=default use-peer-dns=no user=""
IPSEC/IPIP/MSS Mangling
/ip firewall mangle
    add action=jump chain=forward disabled=no jump-target=ipip-ipsec-mss-mangle in-interface=ipip
    add action=jump chain=forward disabled=no jump-target=ipip-ipsec-mss-mangle out-interface=ipip
    add action=jump chain=ipip-ipsec-mss-mangle disabled=no jump-target=mss-max-1300
    add action=change-mss chain=mss-max-1300 disabled=no new-mss=1300 protocol=tcp tcp-flags=syn tcp-mss=1301-65535
    add action=change-mss chain=mss-max-1400 disabled=no new-mss=1400 protocol=tcp tcp-flags=syn tcp-mss=1401-65535
DNS Changer IP Subnets
/ip firewall address-list
add address=85.255.112.0/20 disabled=no list=DNSchanger
add address=67.210.0.0/20 disabled=no list=DNSchanger
add address=93.188.160.0/21 disabled=no list=DNSchanger
add address=77.67.83.0/24 disabled=no list=DNSchanger
add address=213.109.64.0/20 disabled=no list=DNSchanger
add address=64.28.176.0/20 disabled=no list=DNSchanger
Enjoy.....
The End
Configure Mikrotik Groove A2hn

Mikrotik Groove A2Hn is the smallest mikrotik outdoor access point which enables the wireless users to enjoy internet and data sharing wirelessly at speed of 125 Mbit per second.It has a 10/100 Mbps ethernet port with PoE support which can be used as a LAN or WAN Depends on your wireless configurations.The golden thing in this device is the pre-installed and fully registered Mikrotik OS Level 4.This device has 630 mW output wireless power with 802.11 b/g/n radio.It supports N mode which means it can transfer data upto 150 Mbps but its aggregate throughput is 125 Mbit limited by Ether Port.
The fully featured,durable water and weather proof and ready to use powered by RouterOS with level 4.You can use Mikrotik Groove A2Hn as Access Point,Client Station,Or bridge point to point.The LED indicators on it makes it easy to install and Align. Mikrotik Groove A2Hn is easily available at many stores but the recommendation is to buy it from the authorized dealers in Pakistan as they can give you a full warranty and genuine piece.A list of mikrotik’s Authorized dealers is given in this post.
Its Price in Pakistan is Rs.9500/= PKR, E-mail us to buy shaharyar32@hotmail.com
Howto configure Mikrotik Groove A2Hn
In this post we will discuss the complete configurations of Mikrotik Groove A2Hn as an access point.The configurations are quiet easy and simple,there is no rocket science involved in its configurations.Just follow these simple steps to configure Mikrotik Groove A2Hn.
The first and foremost step is to Connect Mikrotik Groove A2Hn to your system and turn on the device.
Make sure you have made the PoE connections correctly. Check that you have connected the PoE cable to Mikrotik Groove A2Hn and LAN to your computer.
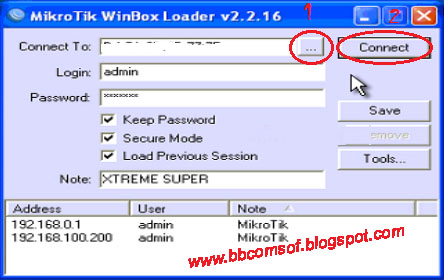
After connecting all the cables,now its time to discover the device on the Winbox discovery.You can download winbox from here.
Open your winbox and click on the box near Connect Button saying “… ” (Click again and again if it does not discover).
Select the Mac of your device from the list and click on Connect.
- Make sure you winbox discovery in not disabled (However it is enabled by default)
- Make sure your windows firewall is not blocking the winbox discovery
- Make sure your antivirus is not blocking the winbox discovery
Configure Mikrotik Groove A2Hn as an access point
To Configure Mikrotik Groove A2Hn as an access point,first goto wireless and enable wlan1 it is disabled by default.In the General Tab,you can see its Mac address,chip info,Bla Bla…..

Click on Wireless>and set mode to AP-Bridge(AP Bridge is used as access point in mikrotik)
Set Band to 2Ghz B/G/N.
B mode gives you 11 Mbps throughput.
G mode gives you 54 Mbps throughput.
and N mode gives you 150 Mbps throughput.(N mode will only work if you have channel width 40 Mhz)
Set channel width to 20 Mhz if you want to connect 20Ghz enabled devices like Tl-Wa 500g,But 40Ghz is recomended.(But N mode will not work)
Set channel width to 40 Mhz if you want more throughput
Frequency is also known as channel in Mikrotik Groove A2Hn.Select that channel which is not already occupied by other devices near you.(You can find others channels by clicking on SCAN)
Put your network name in SSID Field.
Set wireless protocol to Any
Select security profile if you have created any(we will create one later)
Bridge mode enabled.

Your wireless settings are complete,now you can discover your wifi signals in the air.
Set WDS to WDS Dynamic if you want to use repeaters with it.

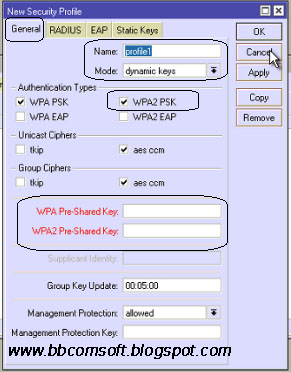
Security settings for Mikrotik Groove A2Hn
Click on security profile,Enter a profile name like WPA-2PSK security.In mode,select Dynamic Keys
I would like to recommend WPA2 PSK security as it is very tight security.
Enter you security keys in WPA2 pre shared key
Enabling internet sharing in Mikrotik Groove A2Hn
Now its time to enable internet sharing in Mikrotik Groove A2Hn,First create a bridge which will connect the wlan and ether 1 with one another.
Click on Bridge,and click on + Sign,Click OK

Now click on ports and click on + Sign Select interface to Ether1 and bridge to Bridge1.
Again click on ports and click on + Sign Select interface to wlan1 and bridge to Bridge1.
Now click on IP > addresses and give an IP address to your LAN port.
Click on red + sign and enter IP Address 192.168.1.6/24 select interface to ether1
Now add a default gateway
Goto IP> Routes Click on red + sign and enter 192.168.1.1 in gateway field.
Now set DNS
Click on IP> DNS and click on DNS settingsEnter 8.8.8.8 as primary DNS
8.8.4.4 as Secondary DNS
Click apply and ok

Now its time to test your internet connectivity by connecting through a wireless device.

Enjoy…..:-)
Comments are on……. The End......


Reviews:
Post a Comment